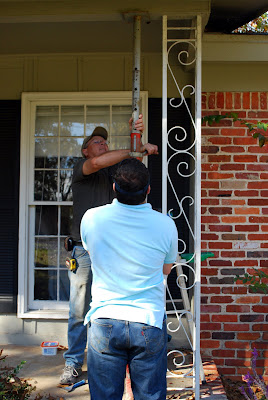
We'll try to be brief about the new porch posts, but we also want to be thorough for those who are interested. Bear with us!

Oh, and don't forget your herding dog -- this is very important! -- she'll make sure you're doing everything properly and to let you know when the power tools are too loud.

Wes's dad kindly did a lot of the prep work before heading down to help us. He used his company's woodworking shop to miter the edges of four 2"x8"s for each of the five posts. He then glued and finish nailed three sides together. These will be going around a 4"x4" support post.

The first construction step of the project is to jack up the beam supporting your porch roof so it doesn't fall on your father-in-law and husband.

With the porch supported you can then take great pleasure in removing your swirly, rusty iron columns. This was surprisingly easy, and was completed using a hammer and chisel to break off the head of the rivet. We had a grinder ready but never used it.

This little guy, we'll call him a steroidal laser pointer, was one of the most important tools we used. It shot a laser at the beam supporting the roof. After we centered the laser on the support beam we marked the location of the laser level so we could mark the location of the center of the 4"x4".

We then used a hammer drill at the previously marked location and installed the Tapcon screw. You'll see why in the next step. After you've done this measure from floor to beam so you can cut your 4"x4" to size.

This little guy is a Quick Mount Porch Post Fastener. This is used to keep your post from making contact with the concrete and water. Just center it up on the bottom of your 4"x4" and use the provided screws to attach. You'll notice it's slotted at the bottom so you can slide it into the Tapcon from the previous step and lock it into place. Take it into account when cutting your 4"x4" or you'll have to cut twice.
 After locking the post in place on the bottom we centered up the top on the beam and used a level to make sure it was straight and plumb on all sides. We needed a persuader, aka sledgehammer, on some of the posts.
At some point your wife/photographer might get bored and start taking pictures of bumble bees. It's okay, she'll finish raking the leaves tomorrow.

It can never be too level, especially during No-Shave November.

Oohh, almost forgot. Before you install you post you'll want to slide this top piece around it. I believe we used a 12"x12" square and just cut a 4"x4" hole in the middle. After installing the 4"x4" and the 12" piece we measured again and cut the 2"x8" "surround". Be sure to cut it about 1/2" short so it does not rest on the concrete. Then we just slid it into place around the 4"x4". We used shims in the gaps to make sure the final piece would fit perfectly into place.

After shimming and then leveling again we screwed the surround into the 4"x4", making sure that no wood was touching the concrete.
 And then screwed the fourth piece into the other three to close up the column.
The next steps that I didn't get pictures of are listed below:
Install trim pieces at top and bottom
Prime everything
Caulk all joints
Wood putty all nail and screw holes
Sand wood putty and any sharp corners
Wipe down and paint
A few miscellaneous notes that didn't get mentioned: The edges of the trim pieces at the top and bottom were also pre-mitered. The top trim is regular pine 1"x6". The bottom is 1"x8" Hardie board which is a cementitious material that will not warp, mold, or mildew. The white plastic post support and the bottom trim are the only parts of the post that are touching the porch.
10 comments:
nice post! we're planning on doing the same thing to our place eventually.
It looks beautiful!! Way to go, Wes! Jennifer, I know you supervised the entire project- behind every good project is an even more fabulous helper. :) Yay for lovely home improvements!!
Wow! You guys did a great job! Looks wonderful!
It looks so good! yeah those swirly iron columns had to go :) great job!
nice...i like the new porch! and wes' new beard...
thanks Katie, Rachel, Caitlin and Zoe (I knew it was you ...)!
This looks fantastic, and has got me thinking about MY house's facade! How wide is your porch?
I love when something so simple makes such a good difference! The style is great!
Columns
Hi Jen & Wes
Saw the flag. War Eagle!! We have the AU logo (the tiger one) painted on our driveway. It was there when we bought the house and it sure makes it easy to tell people how to find us. LOL
Betty
Auburn U. class of 83
What are the colors of the house and shutters? I TOTALLY wanna paint my house like yours!!! BEAUTIFUL!!!
Post a Comment