Friday, December 4, 2009

Day 888's pretty


This has long been one of my favorite images, as I can remember desperately wanting a window seat when I was a child and scheming a way to put one in my bedroom. This little nook would be a lovely spot to sip a cup of coffee and watch a quiet snowfall. The vintage silver on the wreath is the perfect touch.

Happy Weekend!

Photo by Tim Street-Porter for Cottage Living.

Wednesday, December 2, 2009

Day 886's celebration


Today, Michelle of My Notting Hill is hosting a virtual baby shower in honor of sweet Lauren of Pure Style Home. I knew instantly that I wanted to "give" Lauren the Prague Market Sling by Serena & Lily.


I know Lauren would love the beautiful embroidery, and I chose green -- her favorite, as seen in her beautiful living room. I can just picture Lauren chasing 2-year-old Christian around the room with baby-number-2 sleeping soundly in the sling. Congratulations, Lauren! And prayers and best wishes for safe delivery.

Day 886: Santa came early


I decided a few months ago that I was going to ask for dining chairs for Christmas. I mean, you know you're getting old when ... right? I knew I wanted upholstered slipcovered chairs, and it didn't take long to decide on the Henriksdal chair from Ikea. Really, you can't beat the price, and so far we're quite pleased with them.


I'm also so pleased with the way the former living room rug looks in the dining room -- it's a perfect fit! And so much warmer and more finished-looking than without it, yes? Don't worry, the living room floor isn't bare, it's covered in my $19.99 Salvation Army rug.


It was too much of a deal to pass up, though I got it home to discover that it was most definitely almost completely covered in mildew (lovely!). Luckily, a quick Google search came up with simple instructions that worked immediately. I mixed one part bleach with 6 parts water* and applied it with a spray bottle. I used a toothbrush to work it in on the most soiled parts, and it dried mildew-free. Above on the left is the cleaned side, and on the right you can see the mildew. I think it may have darkened the rug very slightly (or perhaps it wasn't completely dry), but since I bleached the whole thing, you can't tell a bit. And yes, I will making more frequent visits to that Salvation Army.

*Just FYI, you should not bleach sisal or jute.

Tuesday, December 1, 2009

Day 885's Christmas decorating inspiration


We haven't started decorating for Christmas yet (I know -- gasp!). There were a couple of things around the house that needed to be done first, and then, well, Monday came. I did pull a couple of boxes out last night, but other than ornaments, we don't have much stored away. Most of what I did last year was in the form of wreaths and garlands I made. With that in mind, I decided to go through my inspiration photos to get a few ideas of what I can do this year, and voila! A Christmas inspiration board was born (even though I claim to never make them).

Clockwise from top left: Bells as a tree topper from Cottage Living, holly wreath by Martha, non-theme tree from Country Living, boxwood garland in Heather Chadduck's kitchen from Cottage Living, simple entry from Real Simple, tablecloth-turned-stockings from Martha, pretty mantle from Southern Accents, and wreath chandelier from Martha.

Monday, November 30, 2009

Day 884


I used to think of myself as such a "city girl," and while I appreciate the convenience and opportunity of an urban way of life, I am so thankful that we have quiet little piece of land to visit, and that my Dad would sooner be buried on this hillside than leave it.


So we spent Thanksgiving on the farm, which isn't much more of a farm than our own backyard, but it is bigger (and prettier).


We took a walk down to the river.


We took a sunset Ranger ride (Hi, Beth Anne and Aunt Cynthia!).


And every morning, we were up and at'em before the frost melted. It did this girl's heart some good.


And it did this girl some good too -- she went days without seeing a leash or a fence, and had so much fun she didn't want to get in the car to come home.


Being a farm dog sure is exhausting.

Monday, November 23, 2009

Day 877: signing off for the week


I'm signing off for the week as we're soon headed to my dad's Tennessee farm for Thanksgiving. This year I'm thankful for lots of things, not the least of which are the wonderful friends I have made through this blog. You all encourage and inspire me every week and I hope you have a lovely, relaxing, and fulfulling holiday!

Happy Thanksgiving!

Friday, November 20, 2009

Day 874's fall inspiration


I'm not a big inspiration board maker, but occasionally, the mood strikes. As fall is coming to a close and Christmas ideas are starting overtake my thinking, I thought it might be fun to put together all of the images that have really inspired me this season. I kept coming back to these six in particular, and together they seem just right (click on it to get a better look).

Clockwise from top left: dead flowers arrangement, super-chic Kentucky barn, office nook (and black wall) inspiration, ironstone against a black wall, pumpkin bread on transferware, black tablecloth.

Happy Weekend!

Thursday, November 19, 2009

Day 873: pretty bedroom makeover


I love this guest bedroom makeover, featured in the November issue of Southern Living (along with this great house).


Associate decorating editor (and Cottage Living alum and fellow Auburn graduate) Anne Turner Carroll took a blank slate and a few family heirlooms (the bed and the desk) and turned them into a bedroom that, if I were the homeowner, I would have to move into!


Gray-green grasscloth (Chevron Sisal (SE1808) by York Wallcoverings) set the tone for the neutral-but-not-a-bit-boring room.


On the bed, white linens are off-set by a graphic fabric (La Fiorentina in Grey, 2430-GWF 611 by Groundworks through Lee Jofa) on the underside of the canopy and on the bedskirt. That amazing pillow is actually a rug that was bought for the floor (they went with a cowhide instead), folded in half, filled with batting, and sewn together. A great idea if you can't find just the right fabric for the job.


The vintage desk was left as-is and is topped with sketches from a sketchbook in ready-made frames. The lamp shade was covered in a coordinating fabric (Sand Strie in Chiffon by Kelly Wearstler through Lee Jofa) and the desk chair was painted and recovered for a modern touch (fabric is Plush Mohair in graphite by Beacon Hill). The homeowner found the abstract painting by Scott Nedrelow on ebay.


Roman shades (in Slubby Linen in Mushroom by Calico Corners) are hung just under the crown molding.

Tuesday, November 17, 2009

Day 872: porch post process


We'll try to be brief about the new porch posts, but we also want to be thorough for those who are interested. Bear with us!


Oh, and don't forget your herding dog -- this is very important! -- she'll make sure you're doing everything properly and to let you know when the power tools are too loud.


Wes's dad kindly did a lot of the prep work before heading down to help us. He used his company's woodworking shop to miter the edges of four 2"x8"s for each of the five posts. He then glued and finish nailed three sides together. These will be going around a 4"x4" support post.
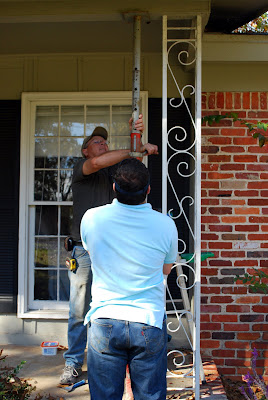

The first construction step of the project is to jack up the beam supporting your porch roof so it doesn't fall on your father-in-law and husband.


With the porch supported you can then take great pleasure in removing your swirly, rusty iron columns. This was surprisingly easy, and was completed using a hammer and chisel to break off the head of the rivet. We had a grinder ready but never used it.


This little guy, we'll call him a steroidal laser pointer, was one of the most important tools we used. It shot a laser at the beam supporting the roof. After we centered the laser on the support beam we marked the location of the laser level so we could mark the location of the center of the 4"x4".


We then used a hammer drill at the previously marked location and installed the Tapcon screw. You'll see why in the next step. After you've done this measure from floor to beam so you can cut your 4"x4" to size.


This little guy is a Quick Mount Porch Post Fastener. This is used to keep your post from making contact with the concrete and water. Just center it up on the bottom of your 4"x4" and use the provided screws to attach. You'll notice it's slotted at the bottom so you can slide it into the Tapcon from the previous step and lock it into place. Take it into account when cutting your 4"x4" or you'll have to cut twice.

After locking the post in place on the bottom we centered up the top on the beam and used a level to make sure it was straight and plumb on all sides. We needed a persuader, aka sledgehammer, on some of the posts.


At some point your wife/photographer might get bored and start taking pictures of bumble bees. It's okay, she'll finish raking the leaves tomorrow.


It can never be too level, especially during No-Shave November.


Oohh, almost forgot. Before you install you post you'll want to slide this top piece around it. I believe we used a 12"x12" square and just cut a 4"x4" hole in the middle. After installing the 4"x4" and the 12" piece we measured again and cut the 2"x8" "surround". Be sure to cut it about 1/2" short so it does not rest on the concrete. Then we just slid it into place around the 4"x4". We used shims in the gaps to make sure the final piece would fit perfectly into place.


After shimming and then leveling again we screwed the surround into the 4"x4", making sure that no wood was touching the concrete.


And then screwed the fourth piece into the other three to close up the column.

The next steps that I didn't get pictures of are listed below:
Install trim pieces at top and bottom
Prime everything
Caulk all joints
Wood putty all nail and screw holes
Sand wood putty and any sharp corners
Wipe down and paint

A few miscellaneous notes that didn't get mentioned: The edges of the trim pieces at the top and bottom were also pre-mitered. The top trim is regular pine 1"x6". The bottom is 1"x8" Hardie board which is a cementitious material that will not warp, mold, or mildew. The white plastic post support and the bottom trim are the only parts of the post that are touching the porch.

Day 871's before and after: front porch


Over the weekend, we completed a project that's been on our minds (and our agenda) since we bought our house (more than a year-and-a-half ago). We replaced the dated, swirly iron "columns" with square wood posts.


Before: This is what the house looked like soon after we bought it in the Spring of 2008.


In the Spring of 2009, we took off the iron storm door, painted the wooden door, and changed the porch lighting (read about it here), and replaced the over-grown bushes (read about that here).


Adding the wood posts has really made a difference. I thought they might look a little too new, but I really think they look like they've been there all along.


I know at least a couple of you have some lovely iron "columns" of your own, so stay tuned for a full post on the process.